Common Self-Tape Editing Mistakes
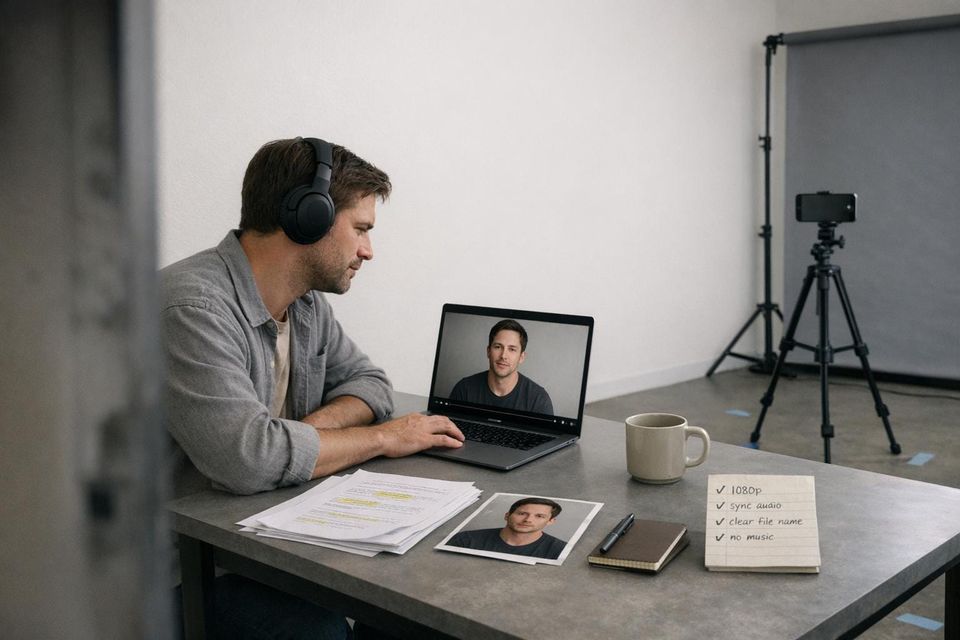
Your self-tape is often your only chance to impress casting directors, and small technical errors can ruin your chances within seconds. Here’s what you need to know to avoid common mistakes:
- Avoid over-editing: Skip flashy effects, transitions, or filters. Keep it clean and simple.
- Fix audio issues: Use an external mic, check for syncing problems, and ensure clear sound.
- Label files correctly: Use a clear format like
FirstName_LastName_Project_Role_Scene. - Don’t over-compress: Stick to 1080p resolution for quality without oversized files.
- No background music: It distracts from your performance.
Casting directors are looking for clarity and professionalism. Focus on basic technical quality to let your acting shine. You can also use audition feedback to refine your technique for future tapes.
5 Self-Tape Audition Editing Mistakes That Can Get You Rejected by Casting Directors
sbb-itb-daa9c42
Using Too Many Visual Effects
Casting directors are interested in you, not your editing skills. Adding flashy transitions or filters to your self-tape can pull attention away from your performance. The Spotlight Team emphasizes this point:
With a self-tape, less is more, so try not to move around too much. It will be distracting for the casting director, and you don't want anything to distract from your acting.
Beyond just the visuals, over-editing eats up precious time. Casting professionals often have to sift through hundreds of tapes under tight deadlines. If your tape is cluttered with unnecessary effects, they might miss the subtle expressions and emotional nuances that make your performance shine. Keep things simple and let your acting take center stage.
Why Simple Edits Work Better
A clean, no-frills self-tape ensures the focus stays on your talent. The Spotlight Team explains:
By following these industry-standard fixes for lighting and camera settings, you'll ensure your technical quality matches your performance – making it easier for casting directors to focus on your talent.
When your tape is well-lit, properly framed, and cleanly edited, it allows the casting director to forget they're watching a self-tape and instead immerse themselves in your performance. On the flip side, flashy edits or distracting backgrounds can snap them out of that immersion. Avoiding these distractions ensures your acting remains the star of the show.
Examples of Over-Editing
Film Editing Pro warns against using outdated or excessive effects:
Remember, nothing screams 'amateur' more than star wipes, glittery flares, and page curls.
Some effects to steer clear of include: star wipes, page curls, expanding hearts, dissolves between takes, color filters, vignettes, or anything more elaborate than a simple cut. These effects not only look dated but can also give the impression that you’re treating your audition like a creative experiment rather than a professional submission.
Other distractions to avoid include:
- Harsh lighting: Ring lights that create glare in your eyes or glasses.
- Cluttered backgrounds: Messy rooms or windows behind you causing overexposure.
- Improper framing: Filming in portrait mode instead of landscape.
These issues make extra work for casting assistants and take the focus off what really matters - your performance.
Next, let’s explore how simplicity in audio and file organization can further elevate your self-tape.
Audio Level and Syncing Problems
Audio quality can ruin your self-tape before it even gets evaluated. Issues like poor lip-sync or uneven volume can pull casting directors' attention away from your performance.
How Poor Audio Affects Your Tape
Casting directors are often more forgiving of average lighting than unclear or out-of-sync audio. Why? Because if they can't clearly hear or understand your dialogue, they can't properly judge your acting.
Problems like volume imbalances - whether caused by competing voices, background noise, or poor mic placement - can weaken your performance. Some common culprits include standing too far from the microphone, recording in echo-prone spaces like large empty rooms, or picking up background sounds from traffic or household appliances.
How to Fix Audio Sync Issues
Start by recording a quick 10-second test clip to check for sync and clarity. This simple step helps you confirm that your audio and video are aligned and free from disruptive noises. Before recording, make sure to silence notifications and turn off any devices that might interfere.
If you're recording in 4K, be cautious - improper compression can cause sync drift. Stick with reliable formats like MP4 or MOV, and always review the final export to catch any syncing errors.
For the clearest dialogue, use an external microphone like a lavalier or shotgun mic positioned close to your mouth but out of the frame. This setup delivers far better audio quality than your phone's built-in mic. Crisp, well-synced audio not only highlights your professionalism but also ensures the focus stays on your performance.
Finally, don't overlook proper file naming to avoid any confusion or misplacement of your self-tape.
Bad File Naming Practices
Once you've ensured the technical quality of your self-tape, the next step is nailing the file name. A poorly named file can create major headaches for casting directors, who might sift through over 200 videos for a single role. If your file is labeled something generic like "video1.mp4" or "IMG_002.mov", casting teams are forced to rename or hunt through files to figure out who the tape belongs to. This wastes their time and reflects poorly on your attention to detail. Getting this right shows you're reliable and professional - qualities casting directors value.
"The performer's name is the differential that makes your self-tape stand out if a casting director needs to go through 200+ videos to find yours." - Spotlight Admin
With many production companies now relying on automated systems to sort files, a mislabeled submission could easily get filtered out before anyone even sees it. Your file name is more than just a label - it’s your first impression and a chance to show you can follow instructions, a critical skill on set, much like optimizing your casting profile to meet industry standards.
How to Name Your Files Correctly
Start with your first and last name to make it easy for casting directors to locate your tape in a crowded folder. Use underscores instead of spaces to ensure the file name remains intact across various platforms and operating systems.
A good file name should include: Performer Name_Project Name_Role_Scene. For example: Jane_Doe_Hamlet_Ophelia_Scene1. If you’re submitting multiple takes, be specific by adding a take number, like Jane_Doe_Hamlet_Ophelia_Scene1_Take2.
"If they don't give you labeling directions, make sure that the file is clearly titled with YOUR NAME, PROJECT and ROLE TITLE." - Heidi Marshall, Acting Coach
Always follow the naming format provided in the casting call. If specific instructions are given, stick to them - even if they differ from your usual system.
Of course, proper naming works best when paired with an organized approach to file management.
How to Organize Files Before Submission
Before you submit, set up a dedicated folder on your device just for self-tape files. This will make it easier to find and rename files as needed. Double-check the final exported file to ensure the audio and video are correct, then rename it according to the casting director’s instructions.
For large video files, use file-sharing platforms like WeTransfer or Dropbox instead of attaching them directly to an email. Sending enormous files via email can clog up a casting office’s storage, which can come across as unprofessional. If you’re using a platform like Vimeo, label the file correctly and include a passcode for privacy.
Adding Background Music or Fade Effects
When creating your self-tape, steer clear of adding background music or fade effects. While it might seem like these elements could elevate the production quality, casting directors aren’t looking for a polished short film. They’re focused on your performance. Anything that pulls attention away from your acting can hurt your chances. A straightforward, distraction-free tape is far more likely to make an impression. Shift your energy from flashy edits to showcasing your performance in the cleanest way possible.
Why Music Hurts Your Self-Tape
Adding background music is one of those missteps that can instantly weaken your self-tape. Just like poor syncing can muddle clarity, music can dilute the impact of your dialogue. It’s often seen as a technical misstep that could lead to immediate rejection. Music disrupts the natural tone of a scene, making it harder for casting directors to focus on your words and emotional delivery. Today’s casting preferences lean heavily toward authenticity, and a soundtrack can strip away that sense of realism.
"Casting directors want to see you, not how well you can edit." - Will Roberts, Author
Music doesn’t just distract - it can diminish the emotional weight of your performance. For many casting directors, your self-tape might be the only chance they get to evaluate your work. Any unnecessary elements, like music, can interfere with their ability to connect with your acting. This is especially important now, as many auditions are reviewed on laptops or headphones. Extra audio layers can muddy your dialogue, making it harder for your performance to shine.
How to Keep Edits Clean
Once your file is properly named, and you've optimized your Casting Networks profile for submissions, focus on keeping your edits simple and clean. Stick to straightforward cuts between your slate and the scene. Avoid using fades, dissolves, or elaborate transitions that shift attention away from your performance. If you’re combining multiple scenes into one file, use basic cuts rather than flashy transitions. The goal is to make your tape as clear and easy to watch as possible.
"If it's hard to watch, a perfect performance doesn't mean much. Make it easy for casting directors to agree." - Will Roberts, Author
Before submitting, review your final edit to ensure there are no distracting transitions or effects. Remember, a professional self-tape doesn’t need to look like a high-budget production. It just needs to be simple, clear, and free of anything that takes the focus off your performance.
Over-Compressing Files or Using Low Resolution
When it comes to self-tapes, excessive compression or low resolution can ruin the visual quality, distracting casting directors from your performance. Over-compression introduces grain and noise that might seem fine on your phone but becomes glaringly obvious on the larger monitors used by casting professionals. What looks "okay" on a small screen can turn into a technical disaster on a bigger display.
This isn't just about looking polished. A grainy or pixelated video can make it harder for casting directors to catch the subtle facial expressions and nuances that highlight your acting skills. Just like poor audio can ruin a tape, over-compression strips away the clarity needed to showcase your talent.
One common mistake? Sending video files directly from your phone via email. Mobile devices often apply heavy compression to shrink file sizes, but this comes at the cost of quality. On the flip side, shooting in 4K or Ultra HD creates massive files - up to four times larger than standard HD - which can be unwieldy to manage and unnecessary for self-tapes.
"The cameras used to shoot the live-action sequences of James Cameron's Avatar were HD, and if HD is good enough for Cameron, it's going to be good enough for your self-tape." - Spotlight Team
What Resolution to Use
To strike the right balance between quality and file size, aim for 1080p (HD) resolution. It delivers professional clarity without the bulk of 4K files. As for frame rates, stick to 24, 25, or 30 frames per second (fps) - these are standard for film and television and give your tape a polished feel. Avoid 60 fps, as it increases file size without improving quality.
If your video looks grainy, focus on improving your lighting setup instead of lowering the resolution. Poor lighting forces cameras to electronically boost the signal, resulting in grainy footage, especially on larger screens. By increasing the light in your filming space, you can maintain a clean, professional look even at lower resolutions.
How to Balance File Size and Quality
To keep your self-tape looking sharp without sacrificing quality, avoid emailing video files directly. Instead, use file-sharing platforms like WeTransfer or Dropbox. If your 1080p file is still too large, you can use video editing tools like QuickTime (for macOS) or Microsoft Clipchamp (for Windows) to convert it to 720p, which offers a good compromise between clarity and size.
Before exporting your final video, revisit your lighting setup. Proper lighting often solves quality issues and allows you to keep file sizes manageable without sacrificing visual clarity. A well-lit 1080p self-tape will always look better than an over-compressed 4K file shot in poor lighting.
Not Exporting Voice Tapes in Mono
When exporting voiceover self-tapes, always use mono. Stereo files often play on just one channel, which can make your performance almost impossible to hear on certain devices.
This isn't just a small technical issue. Clear audio is one of the core elements of a professional self-tape. If your sound quality is subpar, casting directors might miss the subtle details of your performance. For voiceover work - where your voice is the star - any playback issues could mean losing an opportunity before your talent even gets a fair evaluation.
Why Mono Audio Is Important
Mono audio ensures your recording sounds consistent on all devices. It also reflects your professionalism and attention to detail - traits that casting directors value.
Good audio doesn’t just showcase your voice; it shows you're prepared and capable of meeting industry standards. These are key factors when it comes to landing roles. Below is a quick guide on how to export your audio in mono.
How to Export in Mono
Most editing tools make it easy to export audio in mono. Here’s how to do it in a few popular programs:
- Audacity: Open your file, go to Tracks, and select "Mix Stereo Down to Mono." Then export it as an MP3 or WAV file.
- GarageBand: Open the Track menu, choose Configure Track Header, enable Mono, and export.
- Adobe Audition: Right-click your stereo track and select Extract Channels to Mono Files.
Before exporting, check your audio levels and clarity. Avoid using transitions or effects that could distract from your voice. A clean mono file ensures casting directors hear your performance without any technical distractions.
Quick Reference: Mistakes and Fixes
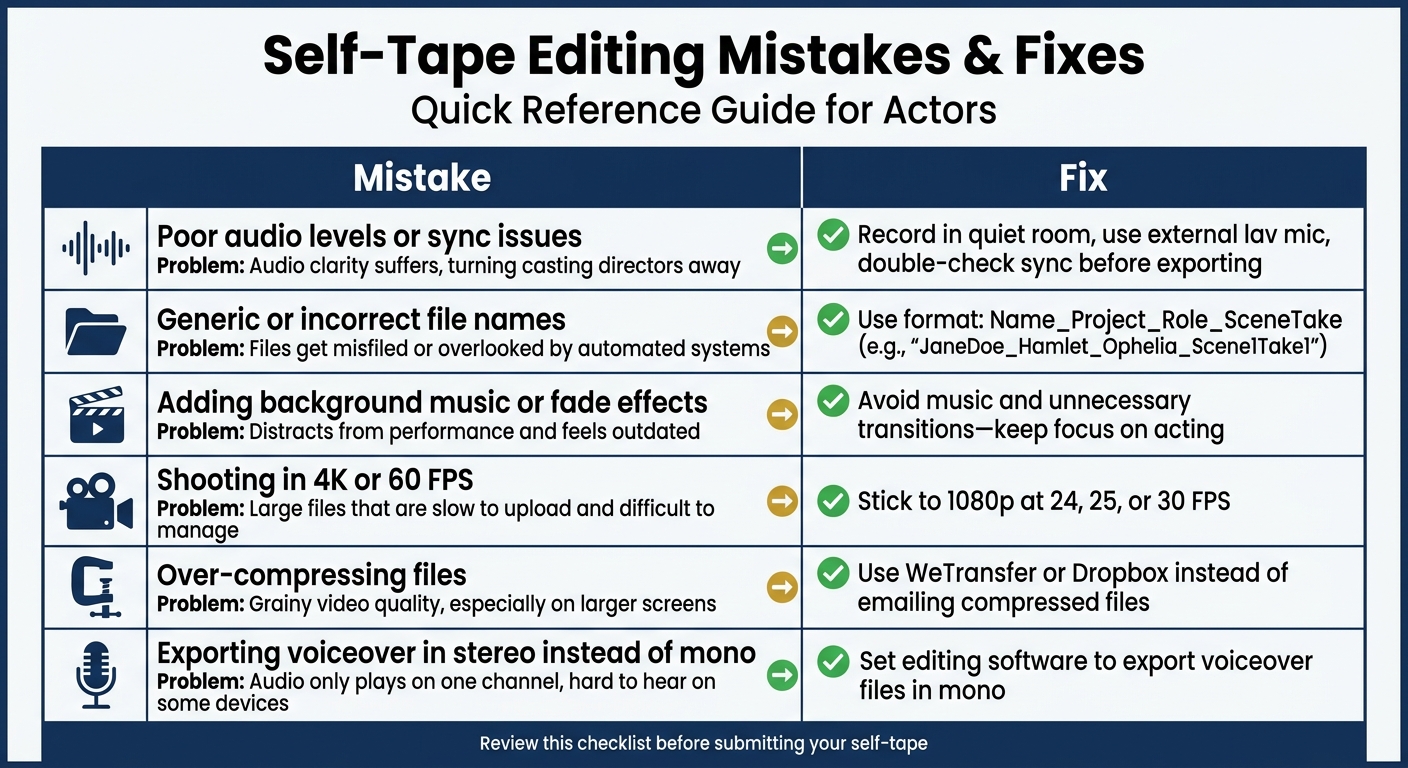
Self-Tape Editing Mistakes and Fixes Quick Reference Guide
When you're preparing a self-tape, nailing the technical details is crucial. Even small missteps can hurt your chances of making a strong impression. Here's a quick table summarizing common editing mistakes, how they can impact your submission, and how to fix them. For more in-depth explanations, check the sections above.
Mistakes and Fixes Table
| Mistake | Problem Impact | Fix |
|---|---|---|
| Poor audio levels or sync issues | Audio clarity suffers, which can turn casting directors away. | Record in a quiet room, use an external lav mic, and double-check sync before exporting. |
| Generic or incorrect file names | Files may get misfiled or overlooked by manual vs automated casting submissions systems. | Name files like this: Name_Project_Role_SceneTake (e.g., "JaneDoe_Hamlet_Ophelia_Scene1Take1"). |
| Adding background music or fade effects | Distracts from your performance and feels outdated. | Avoid music and unnecessary transitions - keep the focus on your acting. |
| Shooting in 4K or 60 FPS | Produces large files that are slow to upload and difficult to manage. | Stick to standard HD (1080p) at 24, 25, or 30 FPS. |
| Over-compressing files | Results in grainy video quality, especially on larger screens. | Use platforms like WeTransfer or Dropbox instead of emailing heavily compressed files. |
| Exporting voiceover in stereo instead of mono | Audio might only play on one channel, making it hard to hear on some devices. | Set your editing software to export voiceover files in mono. |
This table is your go-to checklist for avoiding technical pitfalls. By addressing these issues, you'll make sure your performance takes center stage, not your editing mistakes. Use it as a final review before submitting your self-tape.
Conclusion
Your self-tape is your first impression, and casting directors often make their decisions within the first 10–20 seconds. It’s crucial to avoid editing mistakes so the focus stays on your acting, not technical distractions.
"A clean, simple tape that is turned in on time is better than a polished tape that is turned in late." - Will Roberts, Author, AllCasting
Once you’ve tackled the common editing pitfalls, make sure your submission process is just as polished. Keep your edits straightforward, ensure your audio is crisp, and always review your tape before submitting. These small steps can speak volumes about your professionalism. With roles receiving hundreds of applications in as little as 48 hours in 2026, meeting technical requirements isn’t optional - it’s essential.
After perfecting your tape, CastMeNow can make the submission process seamless. This platform connects directly to tools like Casting Networks and Actors Access, matching you with roles and auto-submitting your applications around the clock. It allows you to focus on what matters most: refining your craft, rehearsing, and creating standout self-tapes.
Master the basics - simple edits, clear audio - and let tools like CastMeNow handle the rest.
FAQs
What’s the ideal self-tape file size for uploading?
To make sure your self-tape uploads quickly and without any hiccups, keep the file size under 500 MB. Files larger than this can lead to delays or even upload failures.
How can I reduce echo in my self-tape audio fast?
To cut down echo fast, try adding sound-absorbing items like blankets, cushions, or rugs around your recording space. These help reduce sound reflections and make your audio cleaner. Another tip: position your microphone closer to you. This not only captures your voice more clearly but also minimizes background noise. With these quick fixes, your self-tape audio will sound much better.
Should I submit one file or separate files for slate and scenes?
Submitting separate files for your slate and scenes is a smart way to keep your self-tape organized and professional. It allows casting directors to review each part individually, making their job easier and ensuring nothing gets overlooked.