How Actors Set Role Rules Across Platforms

If your Casting Networks and Actors Access settings don’t match, you can miss good roles and get alerts for jobs you would never take. I’d fix that with one master rule list and use it in both places.
Here’s the short version:
- I keep one source of truth for:
- playable age range
- gender to play
- ethnic appearance
- union status
- work locations
- project-type yes/no filters
- I split rules into:
- Must Haves
- Nice to Haves
- I use the same wording each platform uses, so I don’t have to guess during updates.
- I name rules clearly, like LA – SAG-AFTRA – TV/Film – No Background.
- I check both accounts side by side before I submit.
- I review everything monthly or quarterly so settings don’t drift.
A few platform limits matter here:
- Actors Access uses up to 2 regions for notifications.
- Casting Networks uses 1 primary location plus up to 2 additional locations.
- Actors Access also has 6 key project filters you can turn on or off:
- non-union
- reality TV
- student films/projects
- real people
- background roles
- non-paying roles
That means even 1 mismatched field can change what each platform sends you.
| Area | What I keep the same |
|---|---|
| Age range | Same playable range on both accounts |
| Gender to play | Same casting choice on both |
| Ethnic appearance | Same label and intent on both |
| Union status | Same status and non-union rule on both |
| Location | Same work markets within each platform’s limits |
| Project filters | Same yes/no choices everywhere |
Bottom line: I’d set the rules once, copy them into both platforms, and review them on a set schedule. That cuts common acting application mistakes and wasted submissions and keeps my role matches tighter.
Build a cross-platform rule framework before changing account settings
Before you log into either platform and start clicking around, streamline your casting search by opening one master sheet. Keep one master rule list as your source of truth. That list should guide every update you make on every platform.
Separate non-negotiable rules from flexible preferences
Split the sheet into two parts: Must Haves and Nice to Haves.
Your non-negotiables are the rules that don’t move. That usually includes union status, workable locations, availability limits, and content limits. Your flexible preferences can change based on your current plan. Maybe you widen your playable age range in one market. Maybe you take a few more student projects for a stretch because you want reel clips. Those can shift without touching your core rules.
That simple split helps you keep the big stuff steady while still leaving room to adjust.
Build a master rule list with platform labels
Use the exact wording each platform uses in your document. If your sheet says one thing but the platform says another, you’ll have to translate it every time you make an update. That’s where errors creep in.
For project-type filters, copy the labels exactly as they appear on the platform so you can move settings over without second-guessing.
| Rule Category | Casting Networks Field | Actors Access Field | Your Choice |
|---|---|---|---|
| Age Range | Ages | Age Range (to play) | 25–35 |
| Gender | Gender | Gender (to play) | Female |
| Ethnic Appearance | Appearances | Ethnic Appearance | Latina/Hispanic |
| Union Status | Union status | Non-union Projects (toggle) | SAG-AFTRA only / Non-union off |
| Background Work | Role Preferences / Background Roles | Background Roles | No |
| Student Projects | Project type | Student Films/Projects | No |
| Reality TV | Project type | Reality TV Projects | No |
| Real People | Project type | Real People Projects | No |
| Non-paying Roles | Project type | Non-paying Roles | No |
| Primary Location | Location(s) | Regions | Los Angeles, CA |
Once the master list is done, the next move is simple: copy each rule into the matching fields on each platform.
Set yes or no filters once and apply them everywhere
Decide every project-type filter as Yes or No before you touch either account.
For example, a Los Angeles-based SAG-AFTRA actor focused on principal work might set:
- Background - No
- Non-paying - No
- Student Films - No
- Reality TV - No
- Real People - No
Once that’s written down, updating both platforms becomes pretty mechanical. You’re just matching toggles and checkboxes to what’s already in your sheet. No guesswork. No “wait, what did I mean here?” moments.
When these switches are fixed ahead of time, applying them in Casting Networks and Actors Access becomes a straight transfer, not a judgment call.
sbb-itb-daa9c42
Name role rules clearly so they mean the same thing on every platform
Once your master list is set, give each rule a name that maps cleanly across platforms and stays easy to update. A rule may feel clear today, but six months from now it can get murky fast, especially when you're lining up two platforms that use different terms. The goal here is simple: turn your logic into names you can reuse across accounts without second-guessing yourself.
Use platform language as your base vocabulary
Start with each platform's exact language. On Casting Networks, that means terms tied to saved searches and filters. On Actors Access, that means Role Matching, regions, and notification filters. Those are the settings that decide which roles reach you.
When your rule names borrow that wording, updates get much easier. You can see the name and know right away where the rule lives and what it controls. A rule called Casting Networks – Union Principal – Los Angeles – TV & Film points you to the platform, the role type, the market, and the kind of project in one line.
Write rule names that include location, union status, and project type
Names like General, Main, or Favorites don't tell you much. They leave out the actual logic: location, union status, pay, or project type. And when the name is fuzzy, updates get slow and rule matching starts to drift.
A simple pattern solves that: [Rule type] – [Union status] – [Location] – [Project type].
Used the same way every time, it gives you names like:
- Primary Union Roles – Los Angeles – TV/Streaming
- Background Only – Non-Union – Local Hire – Commercials
- No Non-Paying Roles – Union Only – New York – Film & TV
Each name spells out what's included and what's not. That matters even more on Actors Access, which allows up to two regions for notifications, so clear geography in the rule name helps you stay inside that limit.
Keep all rules in one reference table
Keep one reference table for names, filters, and review dates. That way, when you update one account, you can check the other against the same source instead of relying on memory.
| Rule Name | Platform | Filters Controlled | Rule Type | Notes | Last Reviewed |
|---|---|---|---|---|---|
| Primary Union Roles – Los Angeles – TV/Streaming | Casting Networks | Principal, Union, Los Angeles, Film/TV | Priority | Paid roles only | Q1 2026 |
| Breakdowns Fit For Me – Union – No Non-Paying – LA/NY | Actors Access | Union, Los Angeles and New York regions, non-paying off | Priority | Use only for LA and NY | Q1 2026 |
| Background Only – Non-Union – Local Hire – Atlanta | Casting Networks | Background, Non-Union, Atlanta | Allow | Local hire only | Q1 2026 |
| No Non-Paying Roles – Union Only – New York – Film & TV | Actors Access | Union, New York, Film/TV, non-paying off | Exclude | Hard no on unpaid | Q1 2026 |
Use Last Reviewed to track updates and notification changes. Pull up this table every time you adjust either account. It also makes future audits much easier. You're not left wondering what General was supposed to mean. It's written down, in plain English.
With names standardized, the next step is applying them to each platform's matching fields.
Apply the same rules in Casting Networks and Actors Access
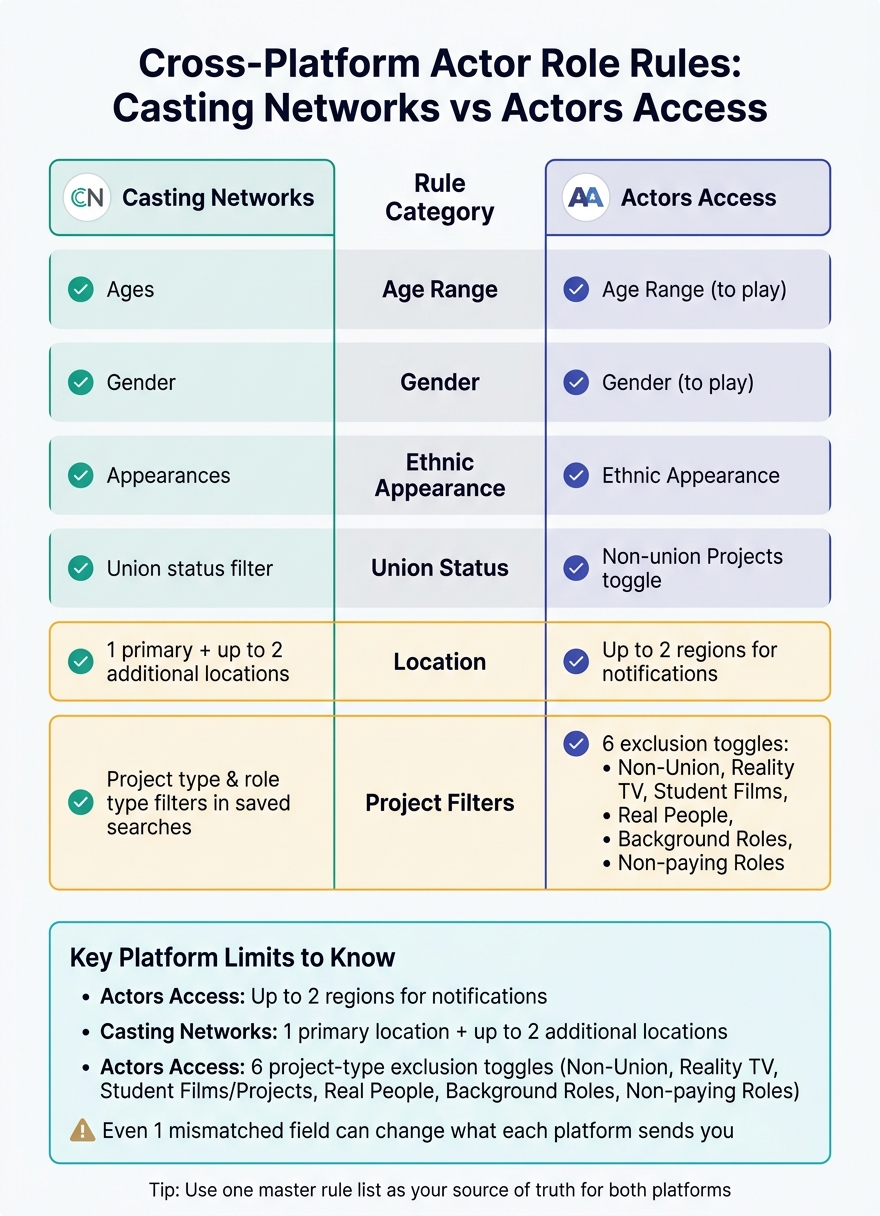
Cross-Platform Actor Role Rules: Casting Networks vs Actors Access
Use your reference table and enter the same settings in both accounts, field by field. The safest way to do this is to go row by row so each field points back to the same source.
Set matching criteria and saved filters in Casting Networks
Start with your Role Preferences in your Casting Networks profile. Pick only the role types listed in your master list. Then set your playable age range to the same minimum and maximum in that list, such as 25–35.
For work location, Casting Networks allows one primary location and up to two additional locations. Choose only the markets where you can actually work. Once your profile attributes are in place, go to Casting Billboard. Apply your filters for union status, project type, role type, and location. Then save each search using a name that matches your master rule table, like LA – Union – TV/Film Only – 25–35. Casting Networks also lets you set one alert frequency for each saved search, which helps keep your alerts tied to the same rules you already wrote down.
After that, take the same rule set and enter it into Actors Access.
Set Role Matching, regions, and notification filters in Actors Access
Match your Casting Networks age, ethnic appearance, and gender settings in Role Matching. Then set the same two regions and the six exclusion toggles from your master list. Those exclusions are:
- Non-Union Projects
- Reality TV Projects
- Student Films/Projects
- Real People Projects
- Background Roles
- Non-paying Roles
Each one should reflect a direct yes-or-no choice from your master rules. No guesswork. No “close enough.”
Compare both platforms side by side before submitting
Use this side-by-side check before you submit. Think of it as a verification pass for the same rules in your master list.
| Rule | Casting Networks Setting | Actors Access Setting | Notes |
|---|---|---|---|
| Playable Age Range | Playable age range in profile | Age Range (to play) in Role Matching | Use the same exact span on both |
| Ethnic Appearance | Ethnic appearance in profile and Casting Billboard filters | Ethnic Appearance in Role Matching | Use consistent terminology on both |
| Gender | Gender identity/appearance fields in profile and filters | Gender (to play) in Role Matching | Match the same casting identity logic |
| Location | Primary location + up to two additional locations | Up to two regions for notifications | Match markets exactly |
| Union Status | Union filter in Casting Billboard saved searches | Non-Union Projects exclusion toggle | Apply the same answer on both |
| Project Type | Project type and role type filters in saved searches | Reality TV, student, real people, background, non-paying exclusions | Map each exclusion to your master list |
Any mismatch is something to fix before you submit.
Prevent mismatches and keep automation aligned
Audit both accounts on a monthly or quarterly schedule
After your side-by-side check, keep those rules synced with regular audits. Settings drift over time, so it helps to review them on a set schedule. Do it monthly during busy seasons and quarterly when things slow down. If your work focus or location changes, update the master rule list first and treat it as the source of truth for both platforms.
Use the same checklist every time on both Casting Networks and Actors Access. That means checking:
- playable age range
- union status
- locations
- role type
- project type filters
On Casting Networks, review profile basics, Role Preferences, saved searches, and automation settings. On Actors Access, review Role Matching, regions, notifications, and background and non-union toggles.
Watch for common mismatch patterns
Most drift comes from age range, location, and background/non-union toggles. Those are the spots where small errors tend to slip in and quietly knock your accounts out of sync.
Use Castmenow (Cast Me Now) to apply consistent rules across connected accounts
Once the same rules are set in both accounts, Castmenow can apply them the same way across connected platforms. Castmenow is an AI-powered submission assistant that connects securely to platforms like Casting Networks and Actors Access, monitors opportunities, evaluates role fit, and handles submissions based on your defined preferences.
That means the assistant is only as good as the rules you give it. If your naming is clear and your settings match across platforms, the automation has a clean lane to follow. A rule named LA – SAG – Principal TV – No Background gives the assistant a direct signal.
When your Casting Networks and Actors Access profiles are clean and synchronized, Castmenow applies the same master rules in a consistent way. Review its submissions after each audit, and compare those submissions against the current master list during every audit.
Conclusion: Keep one rule system and review it regularly
Once you’ve built the framework and mapped it across platforms, the job becomes pretty simple: maintain it.
Use one master rule list and mirror it in Casting Networks and Actors Access. That document should be your source of truth, not either platform on its own.
Clear naming is what makes this work. A rule like LA – SAG-AFTRA – TV Co-Star – No Background leaves no room for confusion. Labels like “Drama” or “Lead Roles” sound fine at first, but they fall apart the second you try to match them across two different systems.
A side-by-side check helps you catch mismatches fast. When your master criteria, your Casting Networks settings, and your Actors Access settings are all in one view, it’s much easier to spot problems before they affect your submissions.
Review the system monthly or quarterly. If your union status, market, or role focus shifts, update the master list first. Then copy those changes into both platforms. That order matters. It keeps small edits from drifting out of sync.
If those updates affect automation, sync that layer right away too. If you use Castmenow to automate your acting audition submissions, make sure its rules match the master list. After each audit, spot-check a few recent submissions against that list.
One rule system, reviewed on a regular schedule, keeps every submission aligned.
FAQs
What should be in my master rule list?
Your master rule list should cover the core settings that guide submissions across platforms: demographic profile, union status, location radius, minimum pay in USD, project types, and specialized skills.
It should also include your current credits, training, and file naming rules, along with the formats you use for headshots, reels, resumes, and bios. That way, your preferences, bio, and assets stay aligned across every account instead of drifting over time.
How do I handle different location limits on each platform?
Set location as a core preference in each profile. Pick your target cities, note whether you’re open to travel, and use one steady radius from your home base. Then line that up with each platform’s filters.
If you use automated applications, double-check that location fields in connected accounts stay in sync. Otherwise, you can end up being submitted outside your target area.
And if match rates start to slip, widen your radius instead of making it smaller.
When should I update my role rules?
Update your role rules and preferences when your appearance, skills, or career goals change. That could happen after new training, a change in union status, or picking up a new skill.
If you keep seeing off-target role matches, try a reset. Clear your preference surveys, wipe your search history, and tighten your filters. It also helps to review your criteria every few months so they still match the opportunities you're after.